These design documents were devised to assist in development of similar Starflight style or any space simulation games. Authored by an interested fan lacking any real resources into how either Starflight 1 or Starflight 2 was designed, they are a combination of gameplay observations, reverse engineering discoveries and outright speculation. Information is focused on underlying game logic and avoids discussion of any particular interface and storyline/plot. All material is original work and copyright (C) 2006 SWirsz and may be used freely as long as it is credited. Feel free to suggest any other topics.
Sources include discoveries recorded on this web site, the Early design documentation for Starflight 1 released by T.C.Lee, and the Microsoft Excel data tables created by Jason Horner for Starflight 1 and Starflight 2 This document also glosses over basic gameplay details which can be found in the Starflight 1 and Starflight 2 manuals.
These documents do not describe any Starflight game in existence, but attempt to promote and break down ideas which could be used for future Starflight-style games. As with most design documents not everything here may be completely feasible to implement.
| Ship Operations - v1.1 - 10/25/06 | ||||||||||||||||||||||||||||||||||||||||||||
| I. CONTROLS
All interface controls should be accessible in three different ways. The classic the system is a basic menu interface, accessible when that game is paused. Likewise a series of relevant icons clicked on by the mouse can also provide controls. Finally a set of customizable hotkeys is highly useful especially for combat controls in particular. Controls only need to be visible and accessible in certain context areas. One suggestion would be to use the function keys lining a roll of icons on the top of the screen that changes for every area the ship is in. II. SHIPBOARD FUNCTIONS These functions can be hotkeys, function keys, or involuntary results of actions (moving on top of object) GENERAL
SOLAR SYSTEM
ORBIT
LANDED ON PLANET
HYPERSPACE
ENCOUNTER/COMBAT
III. DOCTOR FUNCTIONS Crew members have a natural healing rate depending on their health and their location:
Doctor treatments of patients use the following formula: Ship Treatments = Natural Healing + round down(doctor skill/50) healing per hour Let's take for example a patient with 50% health in a terrain vehicle being treated by a doctor with 210 skill. The patient's natural healing will heal one point every 12 hours and at the same time the doctor will heal (210/50)/2 = 4.2/2 = 2.1, round down to 2 health points every hour on top of that. Crew left unassigned any role and abandoned at starport heal as if they were being treated by a fully qualified (250 skill) doctor onboard a ship. IV. DISTRESS CALL/CRYOGENICS A number conditions may leave the player stranded with no possibility of further actions. Examples include running out of fuel or having destroyed or inoperative engines which cannot be repaired. In this case the player has the option to put the crew into cryogenics (sleep pods) and sending a emergency distress call to Interstel for rescue. From the players point of view the transition from where they are to starport is instantaneous. An animation may be played here for the return to starport, either simply a fade to black and reappearance at starport, or a high-speed travel animation, or a fallout style moving animation of a cryogenics pod. Time Passage: measure hyperspace distance to Arth or to the starport in the sector and multiply normal hyperspace travel time by three. Towing Cost: Determine as a factor of the players engine class and the hyperspace distance towed to starport. Use a factor multiplied by the fuel cost calculation of the star map for simplicity. Balance this value out so a player with class five engines towed halfway across the galaxy will pay roughly 100,000. Towing charges are assessed at operations/evaluation. The player is required to view the evaluation before they launch. Towing charges may make a player's financial status negative. V. ENGINEERING FUNCTIONS Damage is first applied to shields, then armor, and then structural items and crew. Damage to structure is divided randomly between seven categories. If any of these categories are missing, then damage will be applied to the remaining categories at a higher rate due to statistical distribution. Damaged items have the possibility of failure and becoming inoperative every time that component is used. Ship systems are displayed as being 100% operational initially and operational percentage is reduced by damage. The percentage chance of a component becoming inoperational is described in the table below. An inoperative component has a 5% chance of becoming operative again every single time 1% of its damage is repaired.
Similar to the doctors skill, calculating repair time for ship systems is a function of the engineers repair skill rounded down. Using the table above which gives the best optimistic repair times, calculating repair time based on the engineers skill is based on the following: Repair Time = Optimum Repair Time * round up(6 - engineer skill/50). Again the same captain's bonus to the engineer skill applies, but if the derived engineering skill after the bonus is 249, the engineer will take twice as long as an engineer with the derived engineering skill of 250. Damaged systems never repair themselves unlike injured crewmembers. Destroyed systems are 100% inoperational immediately without any failure check. Also when a system is being repaired there is a 7% - round down(engineer skill/50) chance (range of 2% - 7%) of needing between 1-10 cubic meters of a random repair mineral every single time 1% of the system is fixed. The player is notified every time a mineral is required for repairs. If that mineral is in cargo a question will be asked "Shall I take this from cargo? Y/N" If the player says no or if the mineral is not in cargo then a message ceasing repair appears and repairs that component stop. If the engineer is told to repair a different system while currently working on another one, the message "I am currently repairing system X, shall I stop and start repairing system Y?" appears with obvious consequences. * When a ship system is 100% damaged it is considered destroyed and unrepairable, so these time estimates are really only the period of time it would take to repair 100% of a ship system, repairable damage is never greater than 99%. Destroyed systems can only be repaired in dry dock at starport or by selling and replacing the system. When hull damage reaches 100% the ship is destroyed and the game is over. ** Chance of failure on using engines is only rechecked when the ship has not been moved in five seconds of real time. Engines will not fail if a player is constantly thrusting and moving, only when he starts to thrust and move. An example would be if engines are 60% operational, then (1 - 60%) / 5 = 8% chance of engine failure every single time the ship starts moving. VI. TIME AND DATE CALCULATIONS One hour of game time for every 10 seconds of real-time except when the game is paused, at starport, in communications, or in a trade center. Encounter game time may also be slowed or stopped. |
| Star System/Orbit - v1.0 - 10/24/06 | ||||||||||||||||||||||||||||||||||||||||||||||||||||||
| LOCAL AND MINI MAP VIEW
Entering a solar system will give the player a spherical or oval mini map view (rectangular view in previous games) of the star and a number of planets orbiting it and a larger view zoomed in close on the players ship and the immediate space around it. A player may enter the solar system either from hyperspace which drops them on the edge of the solar system, or from leaving a planet's surface, which drops them roughly on top of the visual graphic of the planet. Players can also enter and leave this view by entering an alien encounter. Moving on top of a planet will either cause the player to enter orbit around that planet (perform a check to see if player encounters a fleet around that same planet), or if the planet is orbited by moons, move the player to a new area which depicts a zoomed in view of the planet at the center of the screen with the moons orbiting it. On this screen if the player moves on top of the planet or on top of one of its moons, then the player will go into orbital mode.press center COMPONENTS OF THE SOLAR SYSTEM The solar system is composed of one or more suns, and since the majority of stars in the Milky Way are binary systems, hopefully a few binary systems will exist. To simplify orbits and planetary conditions, it is recommended at any depicted binary stars show both stars as relatively close with the first few orbital positions devoid of planets. The equivalent stellar class of a binary system is either two classes higher than the brightest star of the group if the stars are within one class of each other, or else just one class higher than the brightest star of the group. Other components of a solar system include planets occupying orbital positions around the star(s), moons orbiting around individual planets, alien ship fleets traveling around the solar system or orbiting planets in the solar system, and any incidental background graphics such as asteroid fields which the player cannot interact with. The background space will either be black or nebula depending on if the player is in a nebula when they enter the solar system from hyperspace. If the solar system is a nebula then nebula conditions exist (shields inoperative) and the nebula graphic will be used instead of the starry black background for the star system view and for the background planet view from orbit. Each planet type has multiple color and design schemes within that type which reflect their images on the solar system map. Examples of this are "rock:greenish" "rock: grayish" "rock:desert brown", etc. These planetary images could be chosen automatically by calculating the highest percentage of the planet surface that exists within one topographical range or they could simply be calculated randomly, i.e."liquid:dark blue" "liquid:light blue" ORBITAL POSITIONS Every solar system consists of eight planetary orbits, all spherical and coplanar for simplicity's sake. Planets may or may not occupy each of these orbital positions. There is an overall 25% chance per orbital position that a planet will exist there. If a planet exists, examine the probability table below to determine which type of planet to place. When the player enters a solar system, the planets are placed in random positions on their orbital pathways. Either immediately or after a period of time, such as 10 days outside the solar system, these orbital positions are rerandomized and the player will see planets in a different configuration when they reenter the system. Planets have a probability to exist based on their position in that stars ecosystem. These probabilities can easily be overridden by manually placing planet types. Because each star has a different ecosystem range, these probabilities are ultimately determined by stellar class:
PLANET PROBABILITY TABLE
SHIP MOVEMENT The players ship is represented by a small icon representing there ship class. Movement in the solar system is determined by Newtonian physics. The player can spin or rotate their ship at a speed determined by the ship class and the number of turning jets. Turning the ship simply spins the icon in place, movement only occurs by thrusting. When thrusting the players movement is determined through vector addition by taking into account the ship's mass, thrusting force, and existing momentum a to the ship's maximum speed which is also determined by ship class & number of thrusters. When the player hits the center button on the keypad, the ship's thrusters work automatically to cancel all movement. Objects such as planets or moons create a slight inward vector to simulate gravity. This force can easily be compensated by applying minimal thrust. The player cannot "crash" into objects as he or she will simply enter orbit upon "impact." When leaving orbit around a planet or moon, the players ship icon will appear centered over the planet or moon at the point where there is no "gravity" and cannot reenter orbit unless they travel a decent distance away from the icon and then return to it. ALIEN SHIP BEHAVIOR Any number of alien fleets can be placed in the system. Each fleet has a number of important flags:
Alien ships in the solar system can be represented by one of three possible systems: invisible icons that can only encounter the player ship if they are on top of the player ship on the mini map the exact moment of an 2 hour change. This system was used in the previous two Starflight games and artifacts such as the system scanner overlaid a static dot on the map for each ship detected similar to a radar ping when the artifact was used. If the system is used and alien ships must travel at a speed of roughly 1/4 to 1/3rd of the players ships speed. The second possible system would be to use a hybrid slowly updating set of icons on the mini map showing alien ship movement and then display a actively chasing icon representing the alien ship once the ship gets close enough to appear in the zoomed in map. The third method would be to keep actively updating and moving icons on the mini map and keep the actual alien ship hidden on the larger view map, making the actual encounter more random and unavoidable if the alien ship is very near (probability count for counter rather than intersection of an alien ship image on top of the players ship) These last two methods allow alien chips to chase a player at a much faster rate. Alien ships not specifically specified to exist in the solar system will be generated by the computer if the solar system is within that alien territories sphere of influence. If that sphere of influence moves, grows, or shrinks then the presence of alien ships in a solar system may be reduced, disappear completely, or be replaced by aliens of another race. PURSUING THE PLAYER If the first method is used then alien ships can be set to always chase a player. To simulate more accurate behavior with either of the other methods than three state conditions may apply. Behavior in each condition is identical but the conditions are modified. When the alien ship is within a certain radius, it will turn to chase the player. Outside that radius it will ignore the player and simply wander or orbit a planet. When the player first enters a system all ships are in a neutral condition and will chase a player if they are within a moderate radius. If the first encounter ends in combat then all ships in the solar system enter a hostile condition and will chase the player as if the chase radius was infinite. If the first encounter ends peacefully, all ships in the system enter a friendly condition and the chase radius is greatly reduced. Any subsequent encounters ending in combat or not may change the classification from friendly to hostile or vice versa. This condition has no relevance to an alien's emotional index as used in the communication system. After an alien encounter there should be a minimum time allowing the player to escape if he wishes before he meets another alien encounter or perhaps the same alien encounter a second time. Two different time counters, a larger one for meeting the same alien again and a smaller one for meeting a different alien encounter could be justified. Another method is to freeze an alien encounter that was just left and make it immobile for a second or two. ENTERING ORBIT Alien ships can also be hidden in orbit around a certain planet or moon, only encounterable when the player attempts to orbit. For these encounters two flags exist: infinite stack (aliens will call for reinforcements indefinitely and never run out of ships) and block orbit (fleeing the encounter forces the player to leave orbit, the player may not not enter orbit until all the ships are destroyed or the block orbit flight is changed.) ORBIT When in orbit or landed the player can perform a number of functions. (see ship operations) While in orbit a tiled topographical map of the planet surface with random cloud cover will be visible. Atmospheric thickness determines percentage of cloud cover. This topographical map will be overlaid on a sphere roughly a size proportional to the mass of the planet rotating continuously. The angle of the planets axis is a randomly determined value between -90° and +90°. This angle will be visible as the angle seen from the planets orbit, which always approaches along the solar plane. When the player chooses to descend the topographical map will be stretched into a mercator map view without the cloud cover giving the player a chance to select the longitude and the latitude where to descend. The selector bar is a smooth process, showing tiny increments of longitude and latitude to four decimal points. A certain centerpoint is defined on the map and from this point measurements are taken between 0°-180° east or west, and between 0°-90° north or south. LANDING SEQUENCE The landing sequence is a three-step animation which occurs with the players controls locked. The first step is the approach to a partially cloud covered sphere. When close enough to hide the transition convert to a flat mercator view and continue filling in fractal generated details as the planet gets closer. The cloud cover layer should be pierced during this transition. The third step is converting flat detail to a three dimensional image of the terrain surface. When this occurs slowly rotate the player's viewpoint either to the right or to the left (determined randomly) and start to tilt the camera view downward while slowing descent. By the time the ship has "landed" the viewpoint should be 90° left or 90° right of the original angle and the camera viewpoint should be perfectly flat showing the terrain for a reasonable distance. LANDED This view shows the last step of the landing sequence, the mottled terrain directly outside the ship and the sky color. See Planet Generation notes for steps for determining the color of the sky. Launching obviously follows the exact reverse animation as the landing sequence. |
| Planet Generation Design Documentation - v1.2 - 10/24/06 | ||||||||||||||||||||||||
| See star systems tab in Jason Horner's data tables spreadsheet for further information I. External data (* non-preset variables or local variables) Star Spectral class orbital positions available in star system (filled sequentially) planet type (see planet tables below) * derived orbital position Planet Type Table (with sample mass and gravity from SF2) The mass and the gravity readings in this table are all from a single planet that has had its planet type changed. As you can see each planet type has a certain defined range of mass which is multiplied by a constant generated randomly for each planet. This ensures that all planets of a certain type fall within a certain mass range. Surface consists of a topographical map more the lowest surface is liquid. Liquid and a rock planets have identical characteristics. When entering a solar system containing liquid or rock planets, precalculate the percentage of the surface of each liquid and rock planet. If the planet is more than 50% rock surface, use a rock surface graphic on the system display. If the planet is more than 50% liquid surface, use a liquid surface graphic on the system display. To do this easily simply average out the seed altitude points given to the planetary generator. Negative altitude points correspond to layers of liquid and positive altitude points correspond to high terrain. If the overall average is negative then a greater percentage of the planet surface will be underwater and the planet should be categorized as liquid. If the average is positive than a greater percentage of the planet surface will be land and the planet should be categorized as rock. The same seed may be used to randomize the exact planetary mass within the range of that planet's size (as determined by planetary type). Topographical map of liquid and rock planets consists of the following spectrum: dark blue, yellow, brown, dark gray, gray, white. Random forest green tiles, swamp tiles, etc. can be used in low terrain areas. Placement of objects is generated when the player enters orbit around a planet. Given a total of 180 * 360 unique map coordinates, the altitude and type of terrain is taken into account and objects such as minerals, lifeforms, random ancient ruins, random recent ruins, are assigned to each of map coordinate (with all of their properties such as type and size). This randomly generated table is cleared if the player enters orbit around another planet or leaves the solar system. Important objects such as unique artifacts and quest messages are tracked separately and always placed at the exact same map coordinates and disappear permanently when picked up. This data table is simple, containing only a list of objects within each coordinate only with no other values, and all 65,000 coordinate squares may be pregenerated or generated dynamically as the terrain vehicle travels to them. If the player leaves orbit this table is still maintained, only when the player leaves the system and enters hyperspace or orbits another planet is this table cleared. When the player lands and disembarks, the planetary map in a 4x4 coordinate square is generated around the ship and objects are placed on exact positions within each coordinate and lifeforms come alive and are allowed to move. This data table stores the state of every life form, the exact km square within each coordinate were every object is placed, and can be modified by player actions. When the terrain vehicle moves outside this 4x4 coordinate square a message appears "Scanning New Terrain" and new objects are placed. Up to 20 of these 4x4 squares are actively stored in memory, and every exact position of every object is tracked unlike the previous table which generalized objects only within a coordinate. When minerals are picked up, lifeforms captured or killed, endurium taken, the record is kept track only within these data tables and not on the generalized tables. Records are also more precise, the ancient ruin is stored as a separate object from the endurium. When the player leaves orbit all of these 4x4 coordinate square data tables are cleared and if the player returns the same spot would find all objects undisturbed again, in slightly different positions but still within the exact same coordinates they were placed in. If the planet is molten, then no hydrosphere exists. Life may exist on this planet if all criteria are in nearly acceptable levels but only at 1/8th level as it would appear on a liquid or rock planet. Mineral content of molten planets is multiplied by 4X. Topographical map palette is red spectrum oriented. (dark red, red, yellow, brown, dark gray, gray) AMMONIA COMPONENTS (same as atmospheric list) (see mineral listings on reference pages) Primary surface = planet type (molten, rock, liquid, ice, gaseous)
PLANET SURFACE DESCRIPTION
|
| Terrain Vehicle - v1.1 - 10/29/06 | ||||||||||||||||||||||||||||||||||||||||||||||||||||||||||||||||||||||||||||||||||||||||||||||||||||||||||||||||||||||||||||||||||||
| I. INTERFACE
Status Window
Crew Vitality: list every crew members name and their vitality in percentage Text Window
Controls
II. MECHANICS ENERGY USAGE Terrain vehicle movement has two factors. The first is the movement speed and the second is fuel or energy usage. Energy usage is determined by terrain and weather. This usage value is reflected in the efficiency rating displayed for the player. Movement of the train vehicle is smooth, squares are hidden terrain tiles that are used for distance calculations only. Fuel usage is calculated by an inverse ratio of energy efficiency. 10% efficiency equals 1% energy usage per square. Terrain Efficiency is not uniform. It is modified by the nine squares around it. If all nine squares around the square are of lower efficiency than the square will be at the lowest edge of its efficiency range. If all line squares around the square are of higher efficiency then the square itself, then the square will be at the highest edge of its efficiency range. Water and lava count for 100% efficiency when used in this calculation. Energy usage per square = (10 / terrain efficiency) * weather penalty Displayed energy efficiency = terrain efficiency / weather penalty VEHICLE SPEED Speed of movement depends on terrain type (value between 0 and 5). Changes to altitude and altitude itself has no bearing on energy efficiency. Distribution of terrain depends on temperature which is determined by altitude, latitude, and the total planetary temperature range or climate. For example, all terrain with a negative altitude will be liquid or lava, depending on planetary type. A planet which has a climate range of Temperate to Arctic will most likely have rock, snow, or an ice at high altitudes and near the poles. Tropical temperatures will have a higher percent chance of containing terrain that is mud, sand, or carpet life(if the planet supports life.) Similar to altitude points, a number of terrain seeds are scattered randomly over the planet surface and grow their terrain until they intersect with another terrain seed's territory. As you can see from the table below, sometimes it is possible to move faster over terrain which requires more energy.
Weather patterns are dependent on planetary weather. There is a 10% chance of weather shift every hour to a new random pattern. Temperature refers to only the derived temperature at the planet's specific altitude and latitude. Temperate and Tropical = warm. Anything cooler than those ranges = cold. Anything warmer than those ranges = hot. Certain weather conditions only exists in one type of temperature. For overlapping sets (warm weather planets) pick between either condition randomly.
* Weather Damage = round down [base damage * (10 / terrain efficiency) * (1 / weather penalty %) / crew durability] For example, let us say that a human gets hit by electrical storm damage over water. First damage is randomized between 100 and 200, let us say 150. Terrain efficiency is 14%, weather penalty is 50%, and the crew durability is 6, so 150 * (10 / 14) * (1 / 0.5) / 6 = 35. Being in sheltering terrain greatly reduces damage as you can see from the formula above. Every hour during a storm there is a 20% chance of a crew member taking damage and a 10% chance of two crew members taking damage. If a planet is considered tectonically unstable (greater than 2 G's) then first before any other calculation a random chance is figured to determine if an earthquake condition (5%) occurs or any other weather pattern (95%) occurs. If the 95% chance occurs then one of the random weather patterns above is determined. (Thanks to PB Doughboyy and the valiant crew of the ISS Bumbler who gave their lives sitting in the water making weather observations for the basis of this data) CARGO INVENTORY SCREEN Loading the terrain vehicles cargo inventory screen performs the following functions: list all cargo items sorted by cargo type (artifacts, minerals, lifeforms), each items size in M³, and value per M³. Cargo can be dropped (give option for quantity to be dropped, lifeforms cannot be partially dropped so give the player and option of how many lifeforms to drop instead of size in M³ to drop) The inventory screen will also display free space remaining.. Terrain vehicle artifacts are automatically loaded onto the terrain vehicle when it disembarks from the ship. If more than one terrain vehicle artifact exists of the same type, only one is loaded. LIFEFORMS Lifeforms have the following behaviors: attacking, fleeing, wandering, sessile, stunned, dead. Check the life form table under the Starflight 2 section of the main web site for further details of life form types and check the Starflight 2 manual for life form descriptions. Lifeform distribution density on the map is based on two factors: terrain type and planet bio density. Multiply those two values (see terrain type table) to determine and it will give you a value to use for life form density on a planet surface. On terrain which has 100% life form density on a planet with 100% bio, on average every 9x15 area (135 squares) will contain four lifeforms for an average percent chance of 3% per square. Take from the list of tradable lifeforms a total of 5 life form types and distribute over the planet's surface. LIFE FORM ATTACKS Nonaggressive lifeforms can simply be picked up, if cargo space is not sufficient to carry the whole life form then the life form is not picked up. Aggressive lifeforms (determined from the danger level on the lifeform table) must be stunned before being picked up. When a lifeform attacks the terrain vehicle, it either has a 80% chance of hitting or a 20% chance of hitting (if the flat device/TV shield is used) Attack damage is modified by crew durability and by damage rating of life form. Lifeforms must be near the terrain vehicle in order to attack crew. Crewmember attacked is picked at random. MINERALS Mineral dispersion follows the same pattern as lifeforms, except with mineral density factors and the planet's total mineral percent rating of course. Minerals have a random size between 1 M³ and 9.9 M³. Use the Lithosphere components table described in planetary generation to determine what the percent chance of which mineral to place. If the cargo space is not sufficient to store the entire mineral deposit then only enough of the mineral to fill the cargo capacity to 100% is picked up. SENTIENTS If sentients are present on the planet, place collections of housing, icons indicative of their technology level in diagonal groupings together. One out of four settlements contain a single trade center. Sentients either on foot or in a vehicle depending on technology will randomly leave one housing icon to travel to another, 50% of the time in same settlement, 50% of the time to another settlement. SENTIENT ATTACKS Sentient lifeforms will attack the terrain vehicle if the terrain vehicle has fired on sentients on foot or in a vehicle within the last five days, and/or if they are a spacefaring race and the player is on hostile terms with them in space, or if they are simply a hostile race to begin with. Sentient lifeforms attack with ranged weapons that can fire on the player anywhere on the zoomed in map viewpoint. The damage rating and description of their attacks depend on their technology level, Stone Age, metal age, industrial age, space-age. Check the life form table under the Starflight 2 section of the main web site for further details. |
||||||||||||||||||||||||||||||||||||||||||||||||||||||||||||||||||||||||||||||||||||||||||||||||||||||||||||||||||||||||||||||||||||
| Trade Center Design Documentation - v1.0 - 9/27/06 | |||||||||||||||
| I. Information Displays. 1. Graphic (top left corner) Display picture of race unless an item is selected, then display item 2. Status display a. Name of race b. Current balance (money) c. "Purchasing" / "Selling" notification d. Standard trade value percent rating of the value displayed e. Counteroffer field f. Quantity selector (after price is agreed to) 3. Conversation Window / Item selection window Scrolling log of trade chat or display lists sorted by artifacts, then specialty, than standard, then lifeforms, then elements. Price is listed as zero if the item is unsellable, else the initial or final trade price is listed after each item. 4. Option Menu: BUY / SELL / EXIT II. Modified Data (* non-preset variables = will be reset after five days) Race/Planet items for sale & total quantity Race/Planet items willing to buy list Race Emotional Index Items stored in starship hold Items stored in terrain vehicle Standard trade values of all items * Randomized final best price point (equal to initial value if no bartering) * Finalized barter flag and price to buy items * Finalized barter flag and price for sale items * trader emotional (friendly/hostile/neutral) * list of items trader is frustrated with/will not trade * Randomized standard trade goods willing to buy/willing to sell list * Randomized standard trade goods quantity * Quantity left (total quantity - player purchased quantity) * Frustration counter III. Mechanics When on top of a trade center or in any of the eight surrounding squares with the terrain vehicle the player is prompted after dropping out of move mode if they wish to trade. If they choose yes, then the trade window is loaded. Perform an emotional index check with the alien race. (if space faring, perform an additional check to see if on hostile terms) if player has fired upon a planetary residence or vehicle of the alien race in the last five days then kick player out of trade center. When first entering the trade center create the standard goods / elements list and quantity, and create the final best price point for all items. If an item exists on both the buy and sell list, then perform a special evaluation. If the player buys an item and sets a finalized buy price, then change the best possible price point for selling the item to be less than or equal to the buy price but let the player barter for this price independently if they wish. If the player sells an item that is also on the buy list, change the best possible price point for buying that item to be greater than or equal to the finalized sale price. This prevents the player from making money inside one trade center without leaving, and resolves the infamous Starflight 2 trade bug. When setting randomized best price points:
|
|||||||||||||||
| Hyperspace/Star Map - v1.0 - 10/29/06 |
| I. VIEWS
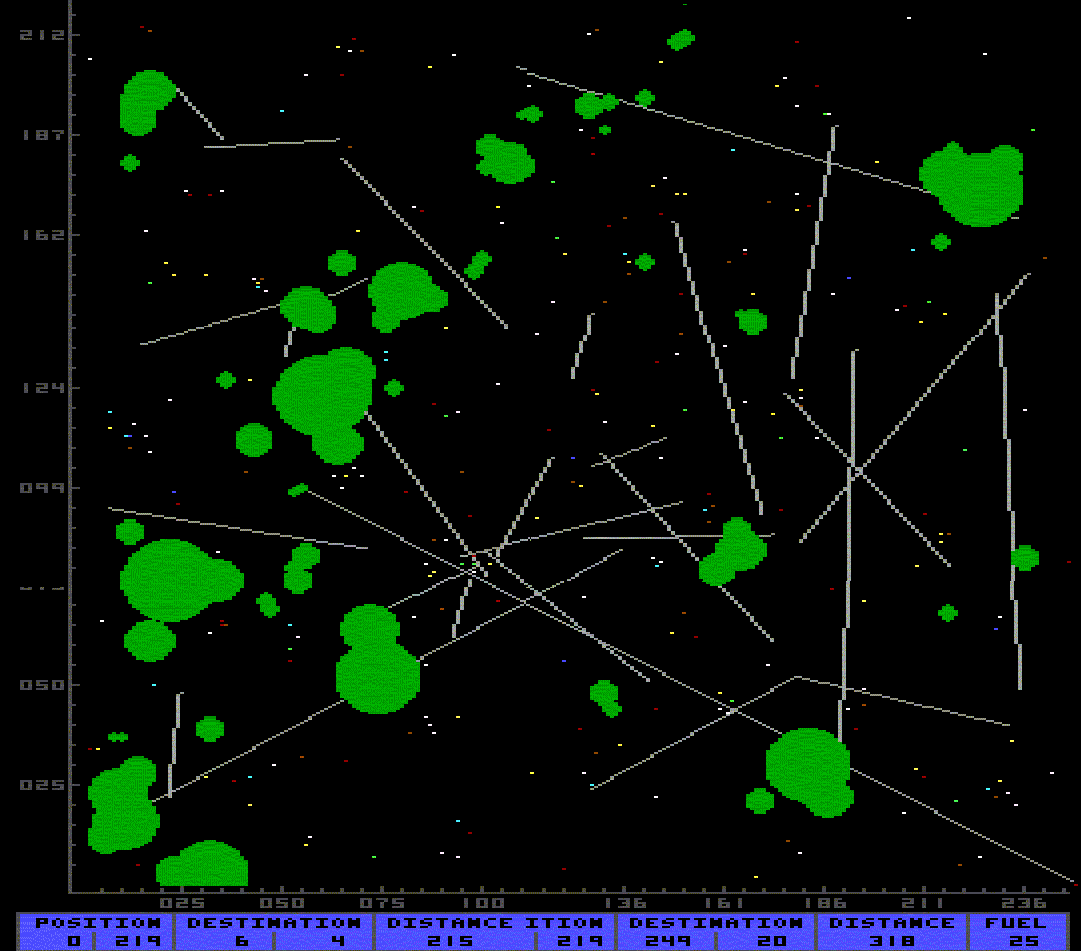
LOCAL VIEW A window taking a majority of the screen will display the starship graphic against a background of space with "hyperspace swirls" or against a background with nebula graphics. Ship movement is shown and controlled on this view. Ship momentum is similar to physics in the star system except that a constant drag is applied against the ship. If the player does not constantly thrust then the ship slows down and stops in place, a distance equivalent to its momentum. Turning jets determined rotational speed but only engine class, not ship mass or thrusters, determines acceleration and top speed. All movement requires fuel, see fuel usage table on the main page. The player's top speed is determined solely by his/her engine class, however this should not be substantially different, class five engines should only be maybe a quarter faster than class one engines, even though class five engines are far more energy-efficient. Alien ships also should have their hyperspace speed somewhat determined by their engine class, except on a different scale toned down to give the player a slight speed advantage. RADAR MINI MAP VIEW In a small circle placed to the side of the screen a radar style map view shows the the nearby area of hyperspace larger than the local view. Stars are displayed as large bright circles on this map, either flickering moving black dots or actively moving dots represent alien ships. Nebulae show up as grayish circular areas of space which completely conceal anything inside of it. The radar map view displays no details inside the nebulae, either ships or stars. Continuum fluxes do not show up on this map, only the local view and the star map. II. HYPERSPACE COMPONENTS STAR SYSTEMS From hyperspace all stars will appear to be different colors and sizes, reflecting their stellar class (see table in the star system section of this document) Class M,K stars will use a small star graphic, class G,F,A stars will use a medium sized graphic, and class B,O stars will use a large sized graphic. Entering a star system will place the players ship on the same side of the solar system as the side he/she entered it. Leaving a star system also makes the player face that direction in hyperspace away from the star. Only the eight cardinal points are used for these direction angles. NEBULAE Nebulae are areas of space filled with gas and dust. There are four basic types of nebulous. Emission nebulae are clouds of high temperature gas, typically red because of the spectrum emissions of hydrogen gas. These areas are typically sites of recent star formation, and will often have higher densities of brighter, shorter lived stars. Reflection nebulae are areas of space primarily composed of dust instead of gas. They reflect instead of the light of stars inside of it and are usually shades of blue. These are also typically sites of recent star formation. Dark nebulae are clouds of dust usually void of stars. They block the light of stars behind it. Supernova nebulae are the result of exploding stars. Composed of heavier materials besides just hydrogen, these clouds of gas and dust are multicolored and dense. Ribbons of a vibrantly colored material are scattered throughout these nebulae. All nebulae interfere with sensors and shields. Some may cause random minor ship damage to the armor or hull at random intervals, although this should be uncommon and not prevalent to all nebulae. Encounters, star systems, and planet views inside of a nebula should all have the nebula screen background and restrictions to visual range/sensors and interference with shields. Only in hyperspace will damage occur from the nebulae itself. CONTINUUM FLUX A continuum flux is a wormhole in space that has the appearance of a black hole with an accretion disk of highly colorful gases. A continuum flux is difficult to detect in hyperspace and will only be visible on the local view depending on the navigator's skill. If the navigator has less than 200 skill, they will remain invisible. Between skill levels of 200 and 250 the range in which a continuum flux is detected increases. After a continuum flux has been found, a small gray X will appear on the mini map from that point on to represent its position. A ring device will extend the detection of a continuum flux to the entire local view screen, and will eliminate the chance of a navigator getting lost after traveling through one. Most of the time a continuum flux has two entrances, and the player enters one of them, the player can return to the original position by reentering the flux. Some of the time a continuum flux will be a one-way trip, and other times will put the player into a completely different sector. A water tunnel rendered animation will play while a player is traveling through one. ALIEN SHIPS Unlike solar systems hyperspace encounters are determined by probability instead of being set. Certain classes of random ships may appear anywhere (Humana Humana, Nomads, and Minstrels in the last games) but alien ships will typically appear only inside their spheres of influence. A sphere of influence is a modifiable circle in which alien ships of one particular race can be found. These spheres typically will roughly encircle the race's home world, but can sometimes have different center points or move due to events in the game. Spheres of influence may partially or completely enveloped other spheres of influence, and if they do the chances of both groups ships appearing within the shared area is cut in half, giving the player an equal probability of meeting alien ships, but only a 50% chance of meeting alien ships from one race or the other. The sphere of influence (titled with a unique color and name the alien race) will appear on the star map after the player encounters a ship inside of the sphere. Generally one alien ship is created to chase after the player every five seconds of real-time. When the player ship encounters an alien fleet, an animation is played (perhaps of the players ship shrinking or a pure black area of space growing over the local view map, etc.) and the player enters encounter mode. When the player leaves encounter mode and returns to hyperspace the animation is played reverse. In both cases the animation takes "time" in which other alien ships can move and the player cannot. ALIEN FLEET CREATION The sphere of influence has two actual values, the actual sphere itself which represents where of the alien ships will be created within, and the second sphere roughly the radius of two mini map views larger, which represents how far the alien ships will chase a player before disappearing. Alien fleets are randomly generated (see solar system) with random numbers of ship types and overall number of ships. Typical patterns will be either X number of warships, 1-2 scout ships, or a mix with all three ships including transport ships. The alien ship fleet disappears if it is destroyed or communications end peacefully or if the player is on good terms with the alien race and simply flees. If the player is on hostile terms and runs away from an encounter then it will shortly reappear a few seconds later. If the player gets three hostile fleets with the top engine class chasing him/her and the player continually runs away, it should be impossible to escape them due to the delay animation described above. Gameplay testing should be used to determine the length of the animation and also the speed of movement of the players ship and that of the alien ships to balance this out. III. STAR MAP The star map has several functions, the first is to display on a grid pattern all star systems and nebulae in a region of space. Alien spheres of influence and continuum fluxes are also displayed but only after they are discovered by the player. The player's current position is reflected by a small rectangle on the map, and the player's current position is shown in X,Y coordinates at the bottom of the map. The pointer which is moved by the mouse also has a "Destination X,Y" coordinate at the bottom of the map, and the fuel needed with the ship's current engine class to travel to that point is shown. The total distance that the ship can travel is displayed as a lightly colored gray sphere around the player's current position. Fuel would be exhausted if the player travels in a perfectly straight line the entire radius of this sphere, marking the range he/she can explore. The bottom of the screen also has tabs for displaying other sectors, hidden until they are traveled to. The player can scroll the map by either clicking to "grab" the map and pull it one direction or another, zoom in smoothly in and out with the plus and minus keys or the mouse wheel, or can move the mouse to the edge of the screen to slowly scroll the entire map in that direction. In an unexplored sector, or may be the distant corners of and explored sector, the star map should contain no details and only be revealed in a "fog of war" style fashion within a 30 sector radius of where the ship has traveled. This encourages exploration of the entire sector, gives a visual representation of where the ship has been and where it has yet to travel to. Visited stars are shown in a brighter hue than unvisited stars. When the mouse is moved over a visited star system then a small box with a list of planets appears. Each planet shows a mini icon representative of the planet's color as seen from the solar system, bio density, mineral density, and another mini icon if the planet is inhabited. If the planet was orbited then all of these details are filled in. If not then only the planets many icon is visible and the word unknown appears next to it. If the system scanner is used inside the solar system then all planets will have their details filled in. |
| I. Modified Data (* non-preset variables, reset after each encounter) Emotional Index of each alien race Hardcoded Personality Index of each alien race:
* Temporary Emotional Index
If the temporary emotional index is increased up to the fight/flight level the alien will terminate communications and perform the appropriate action based on the relative strength index. (described below)
OBSEQUIOUS AND HOSTILE
FIGHT OR FLIGHT
No communication is possible. There still is many possible actions available here. The alien may either decide to attack, evaluate that the players ship is too strong and send out a distress call for more ships before attacking, or decide to flee. See conditions for surrendering. Most rational aliens have a threshold on their behavior between the hostile/obsequious and the fight/flight thresholds when the player's strength outmatches the alien's strength. Most aliens will give the player a chance to communicate and change their emotional index rather than flee outright indefinitely.
Certain alien races will take offense being ignored. Every time a certain delay is reached, for example Conversation lag or waiting for response to a yes/no question may increase or make an aliens temporary emotional index more hostile.
|
| Miscellaneous - v1.0 - 10/20/06 |
I. Music
II. Sound effects
|
Starport
Ship Operations
Star System/Orbit
Planet Generation
Terrain Vehicle
Trade Center
Hyperspace/Star map
Encounter/Combat (this subject intentionally left blank)
Communications
Miscellaneous